Ok, I have been meaning to get a few more gift ideas up before Christmas gets any closer, but just haven’t found the time to sit down and blog. So, instead of making this into three separate posts, I figured I’d slap ‘em all together and share ‘em with you faster!

I happened upon this neat site once, looking for some craft idea or another, can’t quite remember! ANYWAY! I think these little paper dolls are so sweet! You print off the outlines of the dolls ( or you can choose to print them in color) and choose from hundreds of sheets of hair, accessories, clothes and themes. There is a complete nativity set, including animals, pirates, princesses, doctors, holiday themes, seasonal sets, cultural themes, the ideas go on and on. I printed out a pilgrims and natives set right before Thanksgiving and used them as part of a quick study on the holiday.
The site is www.makingfriends.com . There are craft ideas, the paper dolls and lots of activity ideas based on theme or age group, definitely worth checking out if you craft with young children!
I got a cute flowered folio from the dollar store and printed off a pile of the outfits and accessories. I’m including some popsicle sticks to glue onto the backs once they are coloured. They’ll make neat puppets in the puppet theater of a certain little girl I know! Quick and easy, or hours of fun colouring and designing outfits for kids ! I don’t know how to price this gift, it’s basically just the cost of printing it off at home ( which for me with our photocopier is less than 1cent a page). Whatever it costs you to run your printer, this is still a cute and easy gift.
The site also suggests you can laminate them after colouring and use a repositionable glue to hold the clothes in place. Then you’d be able to change outfits instead of just gluing them in place as I’ve done with my kids. I haven’t found this repositionable glue ( but I haven’t really looked too hard either). If anyone tries this, let me know how it works for you!

2. Nail polish and stickers.
Ok, nail polish is not exactly a ground breaking gift idea, I know! But, I like to give the little stickers with it. I think adding the extra of the stickers makes it a fun gift for a little girl who I happen to know will love them! I like to buy what (for me) is at least a decent nail polish, as opposed to a super cheap one that will not go on well and chip fast. Added to the stickers, this gift cost me about $10 all together.

3. Mini dish cloths and doilies.
Lots of little girls love their play kitchens. It takes no time at all to whip up a mini doily or cute fun sized crochet dish cloth, and give them some special “linens” to play with. I made these out of some left over cotton I had, so there is no real cost to speak of. My girls use theirs as place mats, table cloths, dish cloths… you name it! Send along some new play food or little dishes for a sweet gift!
Tuesday, December 6, 2011
A Hat Trick of Nifty Thrifty Gifties


Thursday, November 24, 2011
Nifty Thrifty Gifty: UV Sensitive Beads
I first heard about these beads in our Apologia Astronomy book that we are using for science this year. They were recommended as a neat extra project to learn about the sun’s rays and how UV light exists even when we think it’s cloudy or not overly sunny out. I found them in lots of places throughout the states, but it took a bit more looking to find them in Canada. Once I ordered them, I got to thinking : Not only is this a fun science project, it would be a great gift idea! 
This is the item that helped me to stubble on www.science-is.com, the neat site I mentioned in my earlier post. The owner is great, they have awesome customer service and I would recommend checking out their site for all kinds of interesting science related gizmos!
The beads are white when they are in no UV light. This package of about 100 beads is enough to make a few bracelets, or a couple necklaces alone, more if you mix them with regular pony beads.

Once exposed to UV, they start to turn color. These are the beads after sitting in the sun for a few minutes on my kitchen table. It’s winter light here, so not bright, and it was through the window, so it’s amazing that there is still enough UV to change them! Still, you can see how the colors start to appear.
My kids have t-shirts that work the same way, and they have always loved them. They are looking forward to making bracelets and “testing” to see how much UV light there is in different situations. Homeschool-wise, there I think there are several interesting projects I’d like to try with them. You could smear your sunscreen on them, and see how much UV is really blocked by your favourite brands, or put some behind your sunglasses and compare them to a set right out in the sunlight. Either the kids will learn the value of wearing the sunscreen and sunglasses, or maybe I’ll learn that they aren’t providing as much protection as I thought!
Gift-wise, I think they are just plain cool. I mean, common, they change color! So many little girls love making bracelets etc. from beads. This would be a more unique kind for them to play with, or share with their friends.
These bags were $5.95 each. Granted, this is more than regular pony beads cost, but I think it’s worth it to have a few of these to play with. I found them at www.stevespanglerscience.com too. They are in the states however, and I figured that any cost savings on the beads themselves would be erased by the extra shipping, exchange and fees. That site has a lot of cool science games and experiments too, and I may try ordering from there in the future. If any of you do order from them, let me know how it went!
Friday, November 18, 2011
Nifty Thrifty Gifty: Rainbow Glasses
 nce-is.com. Basically, they diffuse light and break it into the separate colors so you can see a “rainbow”. It’s like wearing a prism on your face.
 Even Shawn and I have to laugh when we’re wearing them. It’s just good silly fun. While I probably won’t give them as a gift all by themselves, I think they will be a unique little thing to add with our packages this year. They were only $1.95 each! And in case you’re thinking of popping over to Science Is to order some for yourself, maybe wait a day or two until my next nifty thrifty gifty post, I have another neat item from this store coming up. I just wanna give a quick plug for this store.
 It’s a neat little store in the Calgary area that carries a ton of interesting gift and project supplies. Some of the items I bought from there, I couldn't track down anywhere else , so it`s definitely worth a few minutes of browsing!
 My dining room light fixture through the glasses.
Wednesday, October 26, 2011
Cost Breakdown: Home-Made Coffee Creamers
I stumbled upon this site a few days ago and have been sooo excited to try her recipes. The writer wanted to come up with home made creamers because she is trying to cut out everything that isn’t natural or organic from her diet and she couldn’t stand 
She uses lots of fancier ingredients, which I freely and guiltlessly substituted for what I have on hand. The first recipe I tried is for Pumpkin Spice. Many of my friends are loving this flavour right now, and there is something about fall that makes me crave pumpkin… plus I had some left over pureed pumpkin in the fridge…
1 cup whole milk ( ahem, 2% worked just fine for my purpose here)
1 cup heavy cream ( table cream)
3 Tblsp pureed pumpkin ( I had about 1/2 of a cup left over, so I just chucked it all in)
1 tsp pumpkin spice ( I don’t buy the blend, so I threw in some cinnamon, nutmeg, allspice and ginger)
4 Tblsp maple syrup ( I don’t buy the real thing, I use the NN fake stuff because it’s super cheap, but I figured this is how she is adding sweetness and a bit of thickening. I used corn syrup and it worked perfectly!)
1 tsp vanilla extract ( for this I did use my real vanilla)
Wisk ingredients in a med pan over med heat. Cook until milk starts steaming then pour into a glass jar and refrigerate. You don’t want to actually boil the milk or you’ll scold it, just get it so its starts steaming lots.
Let me just say YUMMY!!!!! Because you are cooking the milk, it will store well for a bit in the fridge. With this one, I got about 750 ml of creamer once all the ingredients were added and they thickened that bit on the stove. I don’t know what you pay for creamers that size? Anyone help me out on that one?
The great thing is, this creamer took maybe 5 minutes to make, and from stuff I often have on hand. If you’re making pies with pumpkin, keep out 3 tablespoons and make a batch!
So, wanna know what it costs? $1.30. Yup, that’s it!!! I’m totally guessing the cost of the spices and pumpkin, since those are things I had on hand. The cream cost 82 cents and the milk cost 28 cents. That’s $1.10, so I’ll generously round up to $1.30 to account for the spices. It’s nice to have the cream in it, but if you didn’t care that your creamer wouldn’t be as thick, you could always make it with all milk, and the total cost would be a measly 56 cents plus spices, so maybe 75 cents.
The next one I made was Peppermint Mocha, and it was just as delicious!! Most of the creamers on the website will work out to the same price. If you, like me, already have most of these ingredients on hand, it’s incredibly fast and super cheap to whip up a batch! And hey, throw it in a pretty jar, it would make a great present for any coffee drinkers on your list this year…
Tomorrow I am making the caramel one Mmmmmmmmmmm.
Here’s the link to her page so you can copy all the nummy recipes(Deliciously Organic)
Tuesday, October 4, 2011
Wrap Style Baby Carrier
 Ok, I have to start off by saying that this is not my favourite picture of me, but it does have a funny story which I will tell you first and then get to the point.
 I was at our local museum with our homeschool group and decided that it would be much easier to carry Bremen in the wrap than attempt to get a stroller around. There was also a press conference going on that day, and the local politicians were all there. As I was walking by, our mayor stopped me and grabbed my camera. “ I remember when I was a parent, there are never any pictures of moms with their kids, let me take a picture for you!” I later found out that Jim Scarrow is a real photo bug, but it totally surprised me that he would take time out of his day to take my picture with Bremen. I was talking to Darrel Hickie, our local MLA at the time. Bremen was trying so hard to see what was going on that he looks like his neck is twisted! Anyway, that is the story of this picture…Now I’ll tell you about the wrap itself!
I happened upon an article on a blog I’ve been just loving lately (Raising Arrows) about making your own wrap style carrier. I LOVE snuggling babies, and it seemed like a great carrier for me. It allows me to have two free hands, and it’s become a must have for grocery shopping, fussy days and outings. Haha, not that happy Bremmie has had many fussy days, but you get the point. After reading her super simple directions ( trust me, read the article.. ridiculously simple!) I set out to get material to make a wrap. I bought a cotton that is made for sewing pyjamas, so it only stretches one way. There are lots of cute patterns, and it won’t sag when baby gets heavier like a jersey knit would. This is important to me, since my babies get big fast, in this picture Bremen is 3 1/2 months and just under 20 pounds already!
So, to make one, you buy 5-7 yards of material ( depending on your height), and cut it to about 20 inches wide. Off of one piece of fabric, you should get 3 wraps. I bought this on sale for about $50, so the wraps only cost about $17 each. That’s way less than buying one! If you want to, you can seam or serge the edges. I just did a quick zigzag stitch. There are lots of videos on YouTube and articles all over the net about different ways to tie the carrier. Once you try it a couple of times, it’s really easy!
The wrap is so comfy, it feels just like baby is cuddled up against you for a nap. The material I used is breathable cotton, so it doesn’t get too hot. I tucked a diaper and wipes into one of the layers so I didn’t have to carry anything with me at all. When baby is older, there are even ways to carry them on your back with it!
The first time I wore this, Bremen was just a day or so old, and we went on our epic grocery shopping trip. Everyone kept remarking on it ( they still do) and how sweet he looked all cuddled up comfortably against me. I ran into my sister-in-law who at that time was still pregnant ( our boys are just 7 days apart). “Oh wow” she said" “you bought a wrap, I was looking at those, but I don’t think we can afford one!”. “Really!?” I replied, “ Well, I made this one, and I can give you one too!”. It felt really great to be able to give it away! I still have the third one here, ready to be a gift to the next person who needs it!
These make a quick and easy gifts that anyone can make, even if they don’t sew. You may not have need of a baby carrier anymore, but you could always make some up to give as baby shower gifts!
Sunday, August 28, 2011
The Thank You Loaf
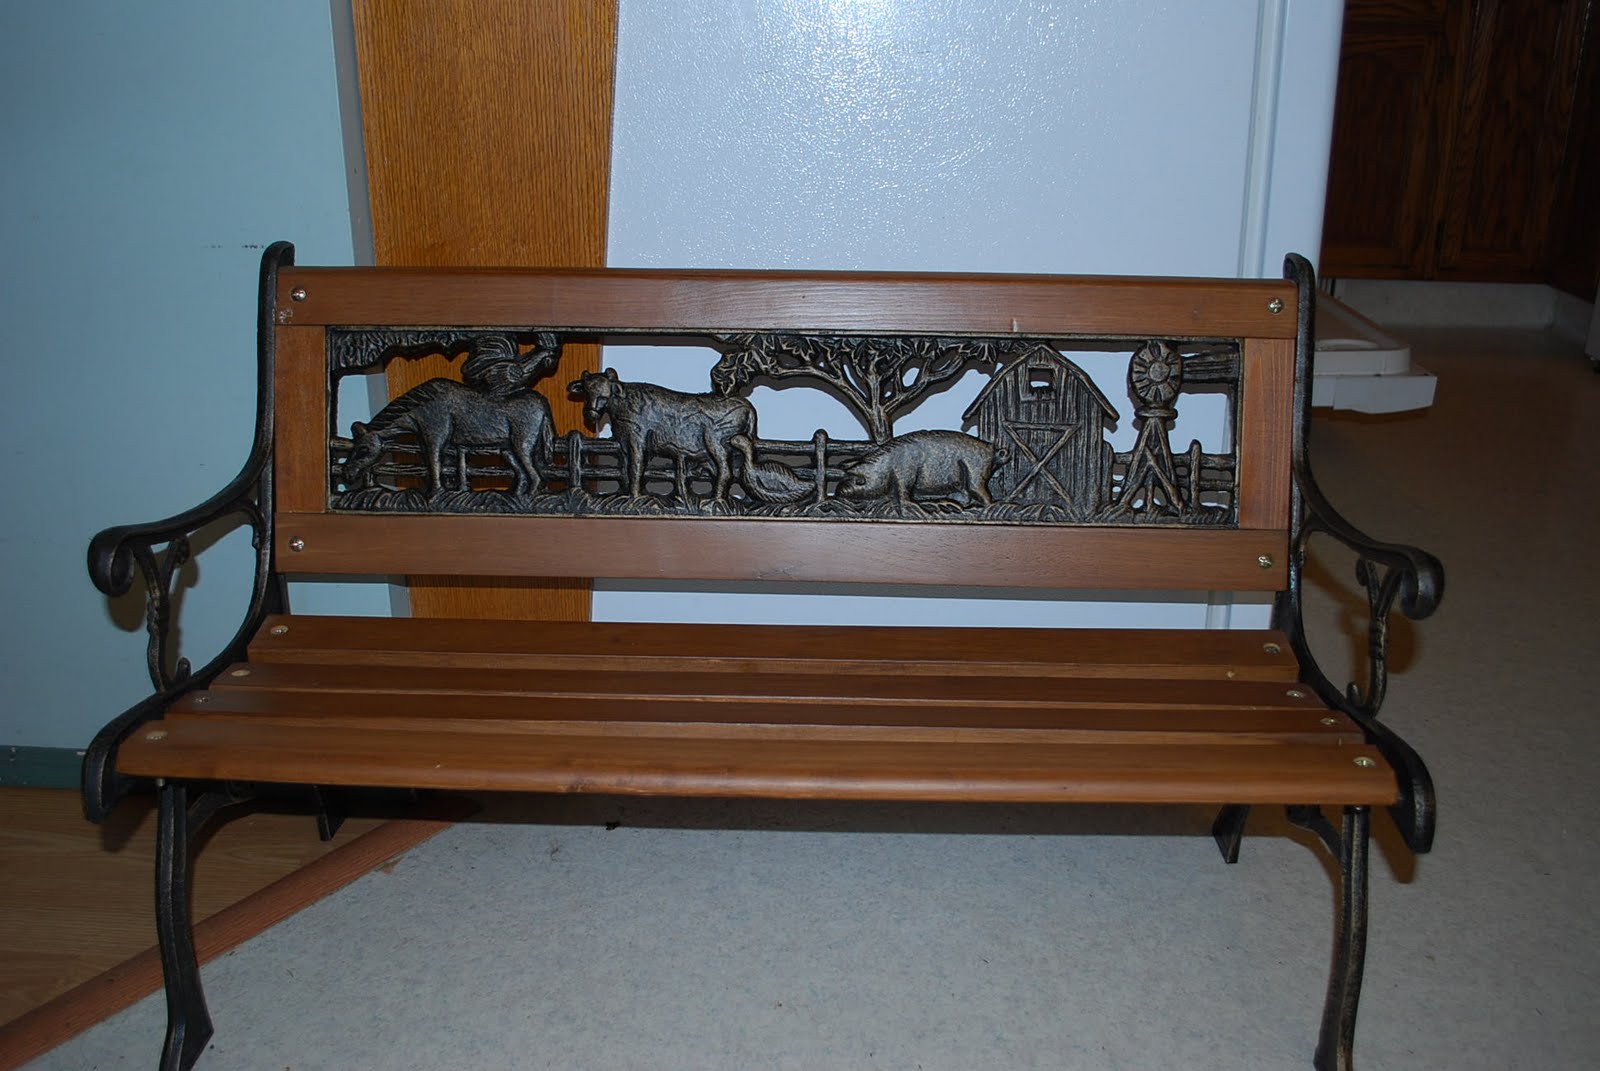 We've recently adopted ( or been adopted by?) our neighbors. They're about the right age to be "grand parents" to our kids and they are very sweet. Last week, they gave our kids the most beautiful child sized garden bench I have ever seen! Within minutes of seeing it, the kids decided it was a train station bench and played "waiting for the train" all morning. I wanted to find a way to thank "Nannie" and "Poppa" for their thoughtful gift, and a post card just didn't seem like enough.
I had baked some banana bread that day, and decided to send a loaf over with the post card. I realized, though, that I didn't know what to wrap the loaf in. I didn't really want to just put it in tin foil, and I didn't have a ziplock bag the right size. Then, this idea struck me.

I got a piece of the flour sack tea towel material and fabric markers and had the kids write "thank you" all over it. Then, Baden and Colleena each wrote their names, Lily scribbled across it and I added Bremen's name as well. We wrapped the loaf in the towel and carried it over next door.
It turns out that "Nannie" used to embroider and decorate tea towels as well, so she appreciated the flour sack material. I think it turned out to be a bit more personal and a nice way to show our gratitude.
It didn't cost me anything to make (because I am the strange sort of person who has flour sack material on hand), but it turned out to be a priceless gift idea I'll probably use again in the future.
Wednesday, March 16, 2011
Nifty Thrifty Gifty: Wall Art

I heard about this idea from a friend of mine, and tweaked it a bit to add my own style to it.

First, I asked around and got some old sheet music ( from the same friend, hee hee!)
I ripped out enough pages to generously cover the canvas I had. Some I left as whole sheets, and some I ripped in pieces to create a neat effect.

Then the girls helped me age the paper with tea. They had lots of fun with this step! If you’ve never done this before: just soak a tea bag in hot water for a few minutes, then without wringing it out too much, wipe, dap and spread it all over the paper. Add layers until you are happy with the color and let paper dry. I was impatient, so I dried mine with the hair dryer. 
Next, I modge-podged the papers to the canvas. Lily, my little helper also generously applied it all over the table…
I layered them at different angles, leaving the torn edges showing, until I was happy with the look. Then I covered the whole thing with a thick layer of modge-podge to seal it. 
Next, I enlisted Shawn to help me make the music note. I had tried looking for something in the scrapbooking stuff, but didn’t find anything I felt suited it. Shawn had this great copper wire, which he bent into shape for me, leaving two pegs that we punched right through the canvas. On the back of the canvas, he put a dab of hot glue on each peg to hold it in place. Then, he attached a string so it could be hung on the wall.

Obviously, I did this in a music theme, but you could do it in any theme that would suit you. My friend who made the original one did a bird theme for a friend of ours. She used pages from an old bird watching book, and used a scrapbooking embellishment of a bird as the decoration. I was thinking it would be nice in a wine making theme too, with a copper wine bottle… Also, since the sheet music I used was all hymns, I was also imagining a cross as the embellishment would be nice. Really, I think you could use any theme you came up with!
Friday, February 18, 2011
Nifty Thrifty Gifty: Barrettes

This is a simple craft I enjoyed doing with Colleena last week. I actually attached them to her valentines, but they would be cute for any occasion. I simply took some of the foam shapes we have in our craft supplies and let her choose how to glue them onto barrettes that I had picked up at the dollar store.
We did hearts, for Valentine’s Day, but little girls love hearts all year, and they would be cute in other shapes too. I operated the glue gun, and Colleena designed them. It cost me $2 to make twelve sets of barrettes.
It was a lot of fun!
Wednesday, February 16, 2011
Planning for Birthday Gifts
2 people say they plan on spending under ten dollars. 2 people say they plan on spending between 20 and 30 dollars. Most of us fall somewhere in the middle, planning on spending between 10 and 20.
If I write it in as a budget line, I plan on $20, hoping to stay just under that. I don’t plan on the ten dollar range, but I LOVE it when that is what I can spend. It seems like if I have to go today and find something, I spend $20, but if I am able to shop around and look for a while, I can find neat stuff for $10. Awesome sales under the $10 mark are things I pick up for the gift stash.
This week at superstore, their hot wheels trick track pieces, which are normally $29 are on for $7. I grabbed one for the gift stash, so this will be one great present for under $10!
Tuesday, February 1, 2011
Poll Results: Purchasing Used Items
Kids Clothing (13),Your Clothing(11), Bathing Suit (2), Kitchen Items (10), Furniture(12), Vehicle(13), Shoes (4), Toys (12), Books(12), Jewelery(7), Video Games and Movies (11).
If you’re wondering, here are the items I purchase used : kids clothing, some of my clothing, bathing suit, kitchen items, furniture, vehicles, toys, books and movies or video games. For me, a lot depends on where I am getting the item used. I have been given or purchased used maternity clothes. I was given a maternity bathing suit from a friend of mine, which didn’t bother me, but I’m not sure if I could buy one used without knowing who it came from. Same with shoes. If they are in great shape, then I have no problem with used shoes, but I wouldn’t buy a pair that was too worn in. I have all the shoes I need right now, so I can’t even remember the last time I looked at shoes when we were shopping for used items. Kitchen Items don’t bother me, since they all can be washed, same as toys. I love buying toys used, since they are often a better price, and many trendy toys are used for such a short period of time. In fact, this is the only way my kids will get trendy toys from me. Furniture I have no problem buying used as long as you can tell its very clean. Every time we have purchased used furniture, it has been from someone we knew. Books : why not? They depreciate faster than a new car! Video Games and movies? All the time! I got some used jewelery at our merge and purge party. I don’t buy much jewelery, but I would always look at used items, and most of them can be soaked in rubbing alcohol to clean if you need to.
Ok, that wraps up why I do what I do. I was surprised by a few of the answers.It makes me curious about why you would or would not consider some items. Especially books and video games or movies. Are these things you just don't buy at all? What factors influence your decision on used items? (Price, cleanliness etc)
Sunday, January 30, 2011
The Gift Stash
Does anyone else keep a gift stash like I do? Throughout the year, as I see things that would make good gifts, I grab them and put them in my craft closet. Sometimes, there are things I think would be good for a specific person whose birthday is still a couple months away. Sometimes, they are gifts I think would just be handy to have around. I’m always on the lookout for neat little things that become stocking-stuffers.
Because I am able to find great deals, this often saves me money. Several times my gift stash has saved me when one of my kids has been invited to a party last minute. Other times, when the budget hasn’t had any wiggle room, I’ve still been able to have a great gift on hand to give. Over the years, my stash has been depleted and re-stocked several times. I usually try to grab a few neat toys in all the after Christmas sales to keep on hand, but this January we didn’t have room in the budget. After having used up my stash over the holidays, I am feeling like that cupboard is quite bare!
There are a few things left, mostly things for specific people who have birthdays etc coming up. Over the years, here are some of the things I have had in there:A giant tub of play-doh, Crayola Colour Wonder sets, Lego,children’s books, both for my kids and their friends, A Toronto Maple Leafs T-Shirt for my Father in Law, war history DVD’s, A knife set,video game, baby items like bibs, blankets and outfits and kid’s movies. I picked up lots of little things at garage sales during the summer which I put away for my kids to get throughout the year.
As I have used up most of my stash now, I have gone back into stocking up mode, looking for good deals that fit into my budget. Recently, I picked up “Clue Jr.” at superstore. They have a whole rack of them on sale for $10 right now. I think that’s a good gift to have on hand, since lots of kids like board games.
My friend( whom I have already said should be a contributing writer to this blog since she gives me so many ideas) says she crochets a bunch of dishcloths to have on hand. That way, when she wants to give some to all her kid’s teachers, or needs a bunch all at the same time, she doesn’t have to go crazy getting them all done. I am totally going to use that idea! Might be a good idea for me to crochet some of the items I’m planning on making for people in my life ahead of time. Since I’m naturally a procrastinator, this would save me lots of last minute rushing around and stress!
What types of things do you keep on hand? Anything turn out to be not worth keeping on hand? Was anything a life, or budget saver?
Wednesday, January 26, 2011
A Great Idea Deserves to be Shared
One of the things I have enjoyed about sharing my frugal ideas with others is hearing theirs in return. A friend of mine has so many great ideas, it’s a wonder she isn’t writing this blog! Haha! Anyway, here is one of her ideas I wanted to pass on to you.
Buy bulk post cards from Vista Print when they are on sale with an image that works for boys or girls, and have the message read simply “ Happy Birthday!”. Then you can always write your own personalized message on the back, and you’ll always have birthday cards on hand for those last minute classmate’s parties.
I love this idea! You could also order them in a “Thank You” theme if you are getting married, or are someone who uses thank you cards often. Hey, they’d even be great if they read “Thinking of You”. You can put them in an envelope as a stylish card, or write a short note and mail them as a post card.
Right now, Vista Print has a special on, you can order 100 cards for FREE. Might be worth checking out!
Thursday, January 6, 2011
Nifty Thrifty Gifty: Crayons
This is a craft I’ve done before with my kids, and this Christmas season made as a gift for some of their friends. It’s a fun way to use up bits of crayons:
For this gift, we unwrapped crayons and broke them up into little pieces. I had this sun-shaped pan from a previous craft.


The kids had a lot of fun helping! After we’d put enough crayon bits into each mould, I put it in my toaster oven, on a medium heat so as not to warp then pan while melting the crayons. (Lesson learned from past experience).

After the wax was all cooled down, I pushed them gently out of the sun shapes. I snapped a few getting them out, and realized that if I ran the underside of the pan in hot water for a few minutes, it softened up the edges just enough to make it easy to pop the crayons out.

This time, we made each crayon one colour to make a nice set as a gift, but in the past I have done this with mixed up shades of left over bits, and the kids still love using them. A fun activity, even if you aren’t planning on giving them away. If you don’t have moulds in shapes, like this one, or chocolate moulds that can be picked up pretty cheap at any store, you can always make them in muffin tins, or even use a bunch of tin cans. I wouldn’t use a pan or mould you intend to use for food again in the future though, since it does stain and leach colour into the silicone of the pans.
I feel almost silly to admit that in the end, my total cost for this gift was $0. Made entirely out of stuff we had on hand, it’s a great idea to keep in mind.
And the Poll Results Are…..
So those of you who read regularly know about the poll I’ve had posted for everyone to answer. It closed at Christmas, and here are the final results:
Which of the following would you consider acceptable as gifts?( 22 people answered)
Garage Sale find (19)
Re-gifted Item (21)
Thrift Store Purchase (19)
Item from Giver’s Home (19)
I have to admit, I am happily surprised with that. I thought that people would think less of gifts if they knew that they came from one of these places. Maybe I haven’t been giving the people in my life enough credit! What about you? Are you surprised too?
Working on another poll…stay tuned!
Tuesday, November 23, 2010
Beating the Budget Busters: Christmas:Stockings
Ok, so we all know Christmas is a huge budget buster, and there is just no way I can cover it in one post. The first thing on my mind is stocking stuffers.
I want to keep it to around $20 per pretty red sock to fill each kid’s stocking. When I first started trying to come up with a number this sounded absurd to me. How can I need that much?!? It seemed too high. But unless I am going to fill it with junk that will break right away anyway, there is just no way around it.
Some of the items I’ve been picking up include hair brushes, elastics and clips for the girls( around $13 for all of them). Paint and brushes to divide up among all three( $15 all together), their favourite kids tooth paste ( $3), and hot wheels( color changers ones, which are $4 each) are also in my stash. A refill for Colleena’s easy bake oven was almost $7 all by itself! I have a Lego magazine subscription for Baden, which I got for free ( you can check it out at www.lego.com too) and will roll up the first one and stick it in his stocking too. Some dress up items, like a mini parasol and pretty purse are also in hiding for the girls.
In years past, I have also made a stop at value village. Those little bags full of items matched up together make great stuffers! I’ve gotten a whole bag of model horses, which are over $10 each for $1.99. Also, the bags of gaudy jewellery make great stuffers as dress up items for the girls. Farm animals, Barbie furniture, and tub toys are all items that get lumped together and sold for a couple bucks.
Other things I have considered are new tubs of play-do to refill their supply, markers and stickers, coloring books and papers.
I always top off the stocking with a few candies, a candy cane, and of course, a Christmas orange.I think I have enough stuff hidden away for the girls, and might have to get just another thing or two for Baden, but I am almost done the stockings!!
What are your stocking stuffer ideas?
Saturday, November 13, 2010
Gift Traditions
Every Family has Christmas gift traditions. Do you open one on Christmas Eve, and the rest in the morning, or all of them on the eve? Do you fill stockings? Do you have a tradition of drawing names among the adults, or of making homemade items? We all celebrate Christmas gifts with traditions that can be unique to our family.
One tradition I loved growing up was from an Aunt of mine. Every year she gave me a nice set of pyjamas and some perfume or shampoo that was way more pricey than I would normally use. Each year I looked forward to her present and always opened it on Christmas Eve so I could wear the new pjs….except I had to rethink that once I got into my teens and she sent me a bra and panties set. Not what a 14 year old wants to open in front of her brothers and male cousins! Okay, but that memory makes me laugh now!
We’ve started some tradition gifts of our own too. Each year since having kids, we’ve given them a board game for Christmas. I can’t say enough good things about them. So good for kids, fun for us, and a great activity for family nights. It’s getting a little harder now that our kids are further spread out in age and abilities. Baden loves chess. Lily is not interested in anything except throwing the pieces around. Colleena is somewhere in between, loving games like Candy Land, Guess Who, and Life on the Farm. Othello has been a good compromise between the older two, since it’s strategy is like chess and appeals to Baden, but it’s simplicity attracts Colleena too.
Over the last few months, both Baden and Colleena have been interested in “mystery solving”. We’re reading them Nancy Drew and Hardy Boys. I got out my old “Clue” the other night, and we played it with the kids. Colleena had to be on a “team” since her reading, at 4, is limited and she couldn’t read all the words on the clue sheet each player gets. They both loved it so much, however, that it sparked an idea for my Christmas list. This year, their annual board game will be Clue Junior. I’m looking forward to hours playing it and solving the mystery of the missing carnival prizes.
Do you have a tradition gift that you give your kids each year? What are your favourite children’s board games?
Tuesday, November 2, 2010
Quick Update on Some Good Deals
I LOVE Christmas, celebrating our Saviour’s birth, being with family and friends. It’s one of my favourite times of the year, but let’s be honest, it’s also the mother of all budget busters. I’m already on a mission to beat this budget buster!
Just wanted to toss out a quick post to let you know that shutterfly (www.shutterfly.com ) is having a 50% off sale on 7X9 photo books until tomorrow. These make awesome Christmas presents, and I also have 3 10% off coupons that you can use. Let me know if you want one!
http://share.shutterfly.com/action/welcome?sid=0AbNXDds1cNGbjY
Click on this link to see the album I made for Shawn for Christmas. When I joined shutterfly, I got to make an 8X8 hardcover album for free. This is his Christmas present this year.
Also, check out Vista Print ( www.vistaprint.ca ) right now photo calendars are free!
Both sites have other great deals and offers!
Friday, October 1, 2010
Free is out there!
There are tons of things you can have printed for free, and you only have to pay the shipping. I took a look at what this week's free specials were, and tried to see how I could make use of them. Personal note cards were on sale, and I know my kids love to write letters, so I got them each some personalized with images they would like. I made personalized stationary for my son's teacher. Canvas totes were on sale, picked up one of those for free too. Note pads, sticky notes, pens...the list was huge!!
In all, I ordered $90 worth of product, at no charge, and I had to pay just $20 shipping. Check it out for yourself!!
http://vistaprint.tellapal.com/a/clk/gtPtd
Tuesday, September 28, 2010
Nifty Thrifty Gifty: Photobooks
My favourite, easiest thrifty gift idea is photobooks. I made these last year for all the parents and grandparents in our lives (13 in all, seriously!). I originally saw the idea on tv, to take pictures of kids artwork and have it put into a photobook. Kids artwork is cute, but with lots of glued on sparkles and macaronis it's often hard to mail and gets wrecked over time. This way, grand parents can enjoy the kids creations, and they immortalized forever. I included lots of pictures of the kids too, holding the pictures up, or shots of them working on it. I called it "works of HEART"
Every single recipient LOVED it. I had them made in a 6X8 soft cover size, so they fit inside a purse. It was a great idea for many other reasons. Yes, I had to spend a bit of time choosing layouts, uploading pictures and putting the book together. But I only had to do it once! I had copies of the same book printed and sent to my house. I wrote a dedication to each grand parent inside the cover, and put them all in envelopes. Another bonus was that they could be mailed for the cost of just one stamp, instead of the cost of a parcel. And, at a cost of under $10 each! What else can I give all the loved ones in my life for $10 that would be meaningful and appreciated?
My theme this year is four seasons of fun, and I am including pictures of all the fun and neat things the kids do throughout the year...gardening, sledding, horse riding, raking leaves, etc etc.
There are lots of photo websites that are great, Last year I used Black's, but I found their creation program a bit clunky. Their print quality was awesome, though. This year I am using Shutterfly. I'm sure you can look around and choose one you like.
Another bonus free idea: When you sign up for Shutterfly, you get 50 free 4X6 prints. I plan to take a family pic and have them sent with the photobooks near Christmas, I'll write a quick message on the back, and VOILA! Christmas cards! I also got a coupon for a FREE 8X8 hard cover photobook for signing up! I used it to make an album for my husband made up entirely of pictures of him with the kids hunting and fishing. That's what he's getting for Christmas this year...FREE!! For those of you here in town, I also got some coupons for 10% off anything you order, and if you want one, let me know.
A friend of mine fills up a photo album for her grandmother every Christmas with new pictures of her kids. Everyone loves photos of their grandkids!!


 Posts
Posts


